
My oldest son loves all things Yo-Kai. For his birthday I decided to crochet him Jibanyan, just one of the lovable character from his show. This pattern may be messy and has only been tested by me, so if anything is
confusing, feel free to ask or help correct my pattern! Thanks, Natasha
(mnopxs2).


I used all worsted weight yarn (you may use whatever you wish tho) Feel
free to use whatever colors you wish, I am just sharing the yarn I
used. If you want I can look up the specific yarns I used for each
color; I just used yarn I had at home.
Colors:
Red (Head/Body)
White (Head/Body)
Yellow (Eyes/Belt)
Black (Eyes/Belt)
Pink (Nose/Mouth)
Purple (Ears)
Light Blue/Turquoise (Tail/Bell)
Silver/Grey (Bell)
Blue (Tail)
Size E-4/3.50mm crochet hook
Polyfil for stuffing
Pipecleaner for the Tail
Scissors
Yarn Needle
*He came out about 6 1/2 inches tall for me (Ears to Feet), but that will all depend on how tight or loose you crochet :)
Abbreviations:
ch = chain stitch
st = stitch
SC = single crochet
SC2tog = single crochet 2 stitches together (sc decrease)
HDC= half double crochet
sl st = slip stitch
HEAD
Rnd 1: In Red, make a magic ring and work 5 SC in the ring, do not join, work as continuous rounds (We are starting at the top of his head)
Rnd 2: 2 SC in each stitch, repeat around (10 SC)
Rnd 3: SC in first st, 2 SC in next st, repeat around (15 SC)
Rnd 4: SC in next 2 sts, 2 SC in next st, repeat around (20 SC)
Rnd 5: SC in next 3 sts, 2 SC in next st, repeat around (25 SC)
Rnd 6: SC in next 4 sts, 2 SC in next st, repeat around (30 SC)
Rnd 7: SC in next 5 sts, 2 SC in next st, repeat around (35 SC)
Rnd 8: *SC in next 6 sts, 2 SC in next st, (Repeat * once), SC in next 4 sts, With White SC in 1 st, With Red SC in next st, 2 SC in next st, (Repeat * twice) (40 SC)
Rnd 9: *SC in next 7 sts, 2 SC in next st, (Repeat * once), SC in next 3 sts, With White SC in next 2 sts, With Red SC in next 2 sts, 2 SC in next st, (Repeat * twice) (45 SC)
Rnd 10: *SC in next 8 sts, 2 SC in next st, (Repeat * once), SC in next 4 sts, With White SC in next 3 sts, With Red SC in next st, 2 SC in next st, (Repeat * twice) (50 SC)
Rnd 11: SC in next 23 sts, With White SC in next 4 sts, With Red SC in next 23 sts (50 SC)
Rnd 12: SC in next 22 sts, With White SC in next 7 sts, With Red SC in next 21 sts (50 SC)
Rnd 13: SC in next 21 sts, With White SC in next 9 sts, With Red SC in next 20 sts (50 SC)
Rnd 14: SC in next 19 sts, With White SC in next 13 sts, With Red SC in next 18 sts (50 SC)
Rnd 15: (*SC in next 8 sts, SC2tog), SC in next 8 sts, With White, SC2tog, (Repeat * once), SC in next 3 sts, With Red, SC in next 5 sts, SC2tog, (Repeat * once) (45 SC)
Rnd 16: (*SC in next 7 sts, SC2tog), SC in next 7 sts, With White SC2tog, (Repeat * once), SC in next 4 sts, With Red, SC in next 3 sts, SC2tog, (Repeat * once) (40 SC)
Rnd 17: (*SC in next 6 sts, SC2tog), SC in next 6 sts, With White SC2tog, (Repeat * once), SC in next 5 sts, With Red, SC in next st, SC2tog, (Repeat * once) (35 SC)
Rnd 18: (*SC in next 5 sts, SC2tog), (Repeat * once), With White (Repeat * once), SC in next 4 sts, With Red SC in next st, SC2tog, (Repeat * once) (30)
Rnd 19: SC2tog in next 6 sts, With White SC2tog in next 5 sts, With Red SC2tog in next 4 sts (15 SC)
Rnd 20: SC2tog in next 3 sts, With White SC2tog in next 2 sts, fasten off white, With Red SC2tog in next 3 sts
Sew up your hole and hide remaining string.
EYES:
Rnd 1: In Black, make a magic ring and work 6 SC in the ring, do not join, work as continuous rounds
Rnd 2: SC around (6 SC)
Rnd 3, In Yellow, sl st in the front loops only around (7 sl st to make it look like an even circle), Fasten off and leave tails long enough for sewing onto your head.
Feel free to sew on your mouth and nose however you see fit, I copied a picture of Jibanyan the best I could!

EAR #1:
In Purple Ch 2
Row 1: 2 SC in 2nd ch, ch 1, turn (2 SC)
Row 2: 2 SC in first st, SC in next st, ch 1, turn (3 SC)
Row 3: 2 SC in first st, SC in next 2 sts, ch 1, turn (4 SC)
Row 4: 2 SC in first st, SC in next 3 sts, ch 1, turn (5 SC)
Row 5: 2 SC in first st, SC in next 4 sts, ch 1, turn (6 SC)
Row 6: 2 SC in first st, SC in next 5 sts (7 SC)
Fasten off, leave a longer tail for sewing to the red piece.
In Red Ch 2
Row 1: 3 SC in 2nd ch, ch 1, turn (3 SC)
Row 2: 2 SC in first st, SC in next 2 sts, ch 1, turn (4 SC)
Row 3: 2 SC in first st, SC in next 3 sts, ch 1, turn (5 SC)
Row 4: 2 SC in first st, SC in next 4 sts, ch 1, turn (6 SC)
Row 5: 2 SC in first st, SC in next 5 sts, ch 1, turn (7 SC)
Row 6: 2 SC in first st, SC in next 6 sts, ch 1, turn (8 SC)
Row 7: 2 SC in first st, SC in next 7 sts (9 SC)
Fasten off, leave a longer tail for attaching to your head, join your purple and red pieces for Ear #1.
EAR #2:
In Purple Ch 2
Row 1: 2 SC in 2nd ch, ch 1, turn (2 SC)
Row 2: 2 SC in first st, SC in next st, ch 1, turn (3 SC)
Row 3: 2 SC in first st, SC in next 2 sts, ch 1, turn (4 SC)
Row 4: 2 SC in first st, SC in next st, ch 3, turn
Row 5: 2 SC in 2nd ch, SC in next 4 sts, ch 1, turn (6 SC)
Row 6: 2 SC in first st, SC in next 5 sts (7 SC)
Fasten off, leave a longer tail for sewing to the red piece.
In Red Ch 2
Row 1: 3 SC in 2nd ch, ch 1, turn (3 SC)
Row 2: 2 SC in first st, SC in next 2 sts, ch 1, turn (4 SC)
Row 3: 2 SC in first st, SC in next 3 sts, ch 1, turn (5 SC)
Row 4: 2 SC in first st, SC in next 4 sts, ch 1, turn (6 SC)
Row 5: 2 SC in first st, SC in next 2 sts, ch 4, turn
Row 6: 2 SC in 2nd ch, SC in next 6 sts, ch 1, turn (8 SC)
Row 7: 2 SC in first st, SC in next 7 sts (9 SC)
Fasten off, leave a longer tail for attaching to your head, join your purple and red pieces for Ear #2.

Rnd 1: In Red, make a magic ring and work 8 SC in the ring, do not join. (We are beginning at the bottom of his torso)
Rnd 2: 2 SC in each st, repeat around (16 SC)
Rnd 3: SC in next st, 2 SC in next st, repeat around (24 SC)
Rnd 4: SC around (24 SC)
Rnd 5: In Yellow, HDC in first loop around (24 HDC)
Rnds 6-7: HDC around (24 HDC)
Rnd 8: In Red, SC in back loop around (24 SC)
Rnd 9: SC in next 8 sts, With White SC in next 6 sts, With Red SC in next 10 sts (24 SC)
Rnds 10-11: SC in next 7 sts, With White SC in next 8 sts, With Red SC in next 9 sts
Fasten off and leave a longer tail to attach it to your head.
BELL
Rnd 1: In Light Blue, make a magic ring and work 5 SC in the ring, do not join, work as continuous rounds
Rnd 2: 2 SC in each stitch, repeat around (10 SC)
Rnd 3: In Silver, SC2tog around. (5 SC) Sew up your end as best as possible.
In Silver, chain around Jibanyan's neck, attaching one end to the Bell and sewing onto his body.

ARMS (make 2)
Rnd 1: In White, make a magic ring and work 6 SC in the ring, do not join. (We are beginning at the bottom of the hand)
Rnd 2: With Red, SC around (6 SC)
Rnds 3-5: SC around (6 SC)
Fasten off and leave a long enough tail to attach to your body.
LEGS (make 2)
Rnd 1: In White, make a magic ring and work 6 SC in the ring, do not join. (We are beginning at the bottom of the feet)
Rnd 2: With Red, SC around (6 SC)
Fasten off and leave a long enough tail to attach to your body.
I put my body together now before adding my tail. That is all up to you!
TAIL
For the tail you can either crochet it all first and then add your pipe cleaner into the middle, or as I did, SC around the pipe cleaner.
In Red, ch 5, join together.
Rnd 1: SC in each ch around (5 SC)
Rnds 2-20: SC around (5 SC) You can make as many rounds as you want for the tail, I made 20 rounds for my Jibanyan's tail.
TAIL ENDS (make 2)
Rnd 1: In Light Blue, make a magic ring and work 6 SC in the ring, do not join. (We are beginning at the tops of the tail ends)
Rnds 2-3: SC around (6 SC)
Rnd 4: 2 SC in each st around (12 SC)
Rnd 5: 2 SC in next st, SC in next stitch, repeat around (18 SC)
Rnd 6: SC around (18 SC)
Rnd 7: SC2tog, SC in next st, repeat around (12 SC)
Rnd 8L SC2tog around (6 SC)
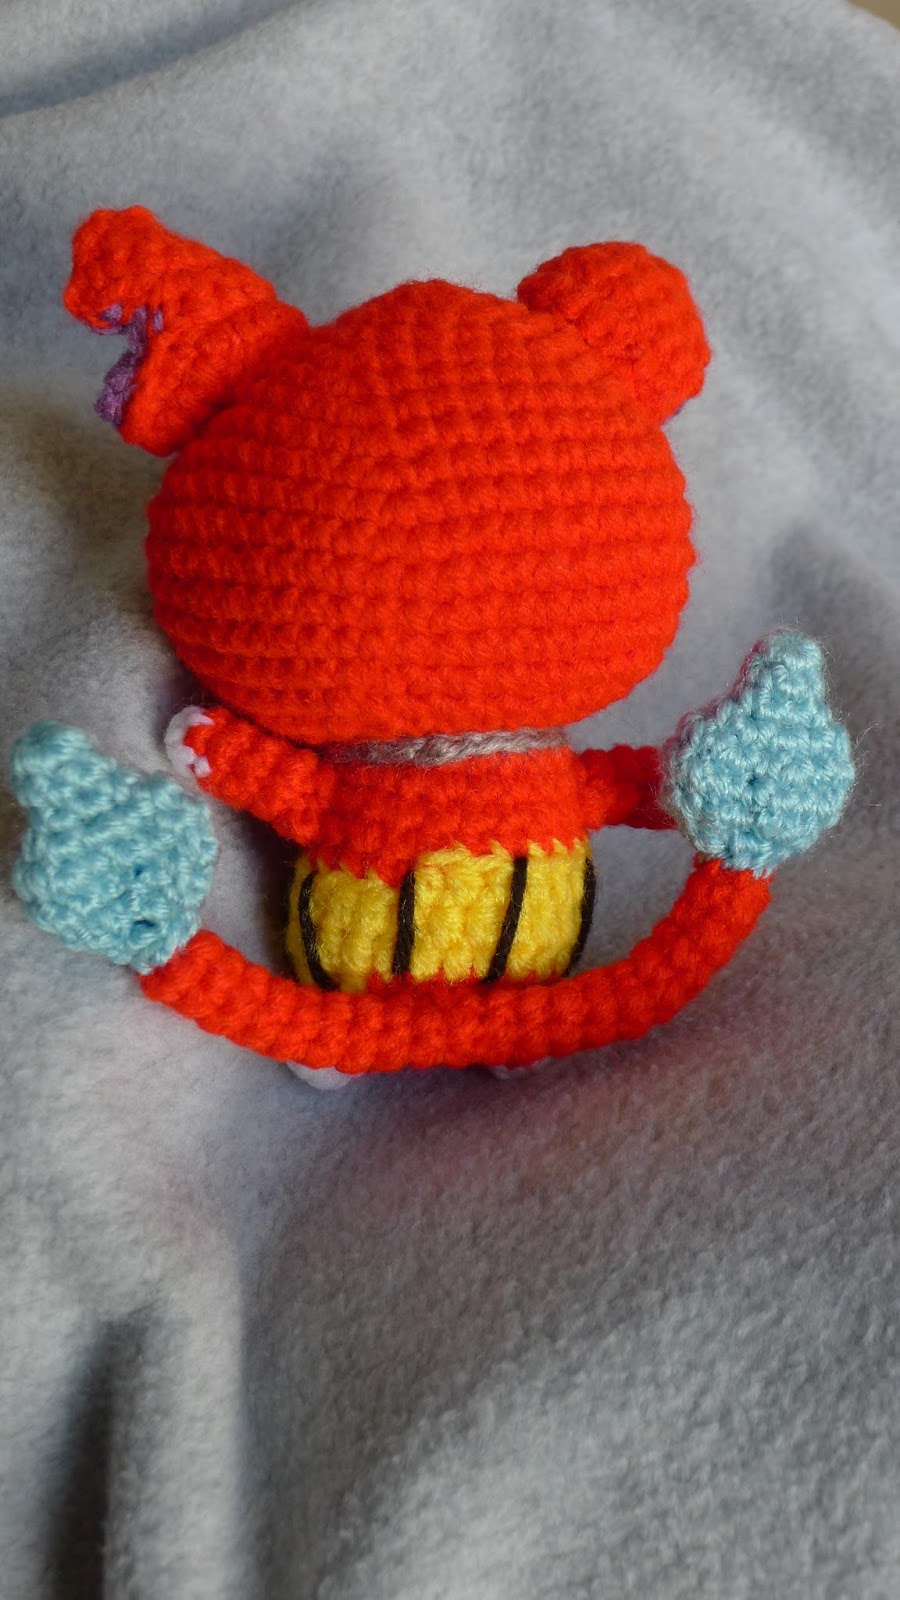
Fasten off and leave a long enough tail to attach to the end of the red tail. I cut and folded the ends of the pipe cleaner so they won't poke through the yarn so easy. I attached the Blue Tail ends and the Red Tails sides with a whip stitch around them. The Picture helps show it off better. Feel free to sew in some blue fire details on the tail. Attach to his body at the middle of the tail and middle bottom of his torso.

Now all that is left is putting together your Doll! Thank you so so so much for reading my pattern! Hope your project turns out wonderful! -Natasha (mnopxs2).

Looking for the Whisper Pattern? http://mnopxs2.blogspot.com/2016/01/crochet-whisper-from-yo-kai-watch.html

Looking for the Dimmy Pattern? http://mnopxs2.blogspot.com/2016/06/crochet-dimmy-from-yo-kai-watch.html

Looking for the Noway Pattern? http://mnopxs2.blogspot.com/2016/07/crochet-noway-from-yo-kai-watch.html

Looking for the Hovernyan Pattern? http://mnopxs2.blogspot.com/2016/10/crochet-hovernyan-from-yo-kai-watch-2.html

Looking for the Hovernyan Pattern? http://mnopxs2.blogspot.com/2016/10/crochet-hovernyan-from-yo-kai-watch-2.html
Oh my I'm so excited I've been looking this pattern as crazy!!! Thank you so much, I'm gonna try, hope it goes well, I'm a beginner but seems very clear the pattern, again thank you thank you thank you!!!
ReplyDeleteMy son is so in love with Yo-Kai, and I didn't know there would be plushies at Target right after I made him one! But he certainly enjoys the guys I made for him! If you need any help, or my pattern is confusing, let me know!
ReplyDeleteUm hey, my name is Rachael and like your son, my brother is really into Yo-Kai. He just got a Whisper plush for Christmas and I want to make him a jibanyan plush as a thanks for helping me with some of my schoolwork. I'm still a beginner with crochet and I don't know what you mean by not join on the head. Can you explain what you mean?
DeleteHello Natasha, thank you so much for taking the time to help me!!! It's absolutelly gorgeous your work, the way you work that doll was amazing, what's not to love from it? =)
ReplyDeleteI'm having some troubles with the head after Rnd 15, when I have to start using white yarn, I don't know if I didn't understand well the pattern but seems like not enough white sc to actually shape the white part, I want to try some changes, but if I can discuss it with you even better because as a beginner I don't know if it's actually right!!! Cheers!
It may look upsidedown as you are working in the round, and the single crochets should have the right-side facing out, or it may be my pattern is confusing. Switch to white before working the stitches that come after the color change. Do any of these help?
DeleteHello! Thank you for taking the time to help me!
DeleteLets try this, for example in Rnd 15 in your pattern:
"(*SC in next 8 sts, SC2tog), SC in next 8 sts, With White, SC2tog, (Repeat * once), SC in next 3 sts, With Red, SC in next 5 sts, SC2tog, (Repeat * once) (45 SC)"
That means in red first 18 sc + 8 sc - 5 sc in white, 12 sc in red... According to this I have 43 sc not 45 sc...
Look what I thought it might be
18 sc in red, 13 sc in white (sc in next 8 sts, SC2tog (repeat * once), sc in next 3 sts), 14 sc with red (6 sc, SC2tog (repeat * once))... In here I have 45 sc
Am I right or I'm missing something in your pattern?
17 red, 13 white, 15 red.
ReplyDelete8,1,8 (red)
1,8,1,3 (white)
5,1,8,1 (red)
If 1s represented sc2tog
I think I will jave to change some wording, or add periods to the color sections, that IS rather confusing!
DeleteSo patterns of 8sc, 1 sc2tog, all the way around.
DeleteOh my my, now I see, I was reading the pattern all wrong, I'm so sorry, the thing as well is that I'm not experienced reading patterns, so I was seeing it all wrong, thank you so much!!!
DeleteI already did the torso, arms, legs and worked out perfect!!! I don't know where I can share a pic with you to check it out :)
I haven't had anyone test the pattern, except me, so it could be poorly explained. I am not sure if you can send pictures on Youtube, if not I have facebook: https://www.facebook.com/TNs-Creative-Corner-457203227684324/?ref=bookmarks or pinterest, or I will send you my email in a pm on youtube. I can't wait!
Deletehttps://www.facebook.com/TNs-Creative-Corner-457203227684324
DeleteThis comment has been removed by the author.
DeleteJust sent the pics to your email!!! Nervous hehehe
DeleteHe is so lovely so far! You are doing amazing work!
DeleteThis comment has been removed by the author.
ReplyDeleteThis comment has been removed by the author.
ReplyDeletePodria subir el tutorial a youtube si lo explica seria perfecto ya que no entiendo muy bien algunos pasos. Gracias
ReplyDeleteI wasn't planning on video tutorials for thr Yo-kai guys. Is there a certain part I can help you with?
DeleteHi. Happy Thanksgiving. I am having trouble with the ears. Ear#1 and Ear#2 are the same pattern. Can't figure out how to get the notch in the one ear.
ReplyDeleteDo rows 4 in purple and 5 in red change with the chain stitches? If not let me know I will check!
DeleteDear Natasha, thanks a lot for your great pattern, i made your yokais fit Christmas dir my sons and they love them! ❤
ReplyDeleteI tried to do some more and they are great, too because I was inspirierd of your cool work! Thank you!
May I send you some pictures?
Br, c.
I would love to see your Yo-Kai! What wonderful Christmas gifts and what a great reception of them from your sons! Thank you so much for the kind words!
ReplyDelete❤ Thank you! ❤ did you find my pics in your profile?
DeleteI just checked now! Those are amazing! You are so talented! Let me know if you ever share the patterns for your beautiful creations! Thanks so much for sharing!
DeleteHello, I made your pattern but i changed some parts. I would like to post my version in my blog, and I would like your permission before doing it. Thank you
ReplyDeleteHi Paula! I can't wait to see your beautiful creation! Absolutely share your own pattern; I don't own the rights to Jibanyan or anything! Feel free to share your link here, and if you want to share mine as well that would be awesome! Thanks so much for spreading the love of crochet!
DeleteThis is amazing thank you! I also have a Yokai obsezsed son who loves all the Nyans Hideabat and Komasan (I think he's cute too hehe)
ReplyDeleteHow big does he come out? He already has medal moments Jibanyans, but a bigger vinyl figure size would be handy
He came out to be roughly 6.5 inches tall, or 16.5 cm.
DeleteMy son has recently become obsessed with Yokai watch again. He's always loved Jibanyan and now is obsessed with Shogunyan so very happy to find this pattern. I will have to see if I can use it to make a Shogunyan.
ReplyDeleteWhat a cute pattern! You're very skilled at crocheting! Are there patterns of some others Yo-Kai Watch characters such as Nate, Valeria Luna, Usapyon or the Great Enma..?
ReplyDelete