Hello Lovelies! It has been a very long while since I have shared a pattern. I have spent a good portion of the year making stuff for others and not much creating.
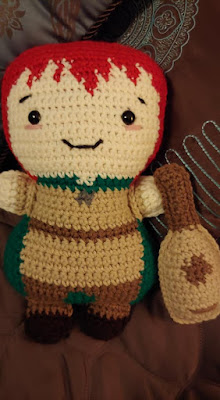
And then inspiration hit all at once! I started doodling out a pattern for a Kvothe ragdoll I wanted to own. I wasn't even sure if it would work out how I imagined it, I just knew I had to try.
And here he is, Kvothe the cute little ragdoll. I hope you all enjoy! This pattern may be messy and has only been tested by me, so if anything is confusing, feel free to ask or help correct my pattern! Thanks, Natasha (mnopxs2).
*Yarn 4 ply Medium Worsted Weight, just used colors I had at home, in the following colors:
Dark Brown (Shoes) I used Red Heart Super Saver in Coffee
Light Brown (Pants and Belt) I used Read Heart Super Saver in Cafe Latte
Tan (Shirt) I used Loops and Threads Impeccable in Heather
Green (Cloak) I used Lion Brand Vanna's Choice in Kelly Green
Grey (Cloak Pin) I used Red Heart Super Saver in Grey Heather
Skin Tone (Face and Hands) I used Loops and Threads Impeccable in Aran
Red (Hair) Lion Brand Vanna's Choice in Scarlett
Black (Eyebrows and Smile) Loops and Threads Impeccable and Black
Pink (Cheek) Lion Brand Vanna's Choice in Pink
*Size H-8/5mm Size, or whatever size you want, it's a cute doll!
Estimate Size: 12 Inches
*Scissors
*Yarn Needle
*12mm Safety Eyes
*Polyfil
Abbreviations:
Inc*Color* = SC Inc
ch = chain stitch
SC = Single Crochet
sl st = slip stitch
DB = Dark Brown
LB = Light Brown
T = Tan
G = Green
S = Skin tone
R = Red
B = Black
P = Pink
Rows- This pattern is worked in rows of SC, built more like a graph, so I will use color abbreviations for how many SC stitches used. To change colors I simply dropped the yarn where it was (always on the wrong side) and picked it up when I needed it. For the hair I used 2 different tiny balls of yarn on each side of Kvothe's face and didn't carry the red across. Look at my picture of the back of the piece to see the dropped yarn mess ;)
*At the end of each row, ch 1 and turn.
*For Inc*Color* Make 2 SCs in that Stich, for Dec*Color* make a SC Decrease in next 2 stitches.
FRONT:
Begin with G and ch 21, turn
R1: 2G, 6LB, 4G, 6LB, 2G (This will be your right side)
R2: IncG, 1G, 6LB, 4G, 6LB, 1G, IncG
R3: IncG, 2G, 6LB, 4G, 6LB, 2G, IncG
R4: 4G, 6LB, 4G, 6LB, 4G
R5: 4G, 7LB, 2G, 7LB, 4G
R6: 4G, 16LB, 4G
R7-10: 4G, 16T, 4G
R11: DecG, 2G, 16T, 2G, DecG
R12: DecG, 1G, 16T, 1G, DecG
R13: 2G, 16LB, 2G
R14: DecG, 16LB, DecG
R15: Skip G st, 16T, Skip G st
R16-18: 16T
R19: 7T, 2GR, 7T
R20: 7T, 2GR, 7T
R21: IncR, 14G, IncR
R22: IncR, 1R, 6G, 2S, 6G, 1R, IncR
R23: IncR, 18S, IncR
R24: IncR, 20S, IncR
R25: IncR, 22S, IncR
R26: IncR, 24S, IncR
R27-32: 2R, 24S, 2R
R33: 2R, 10S, 1R, 13S, 2R
R34: 2R, 12S, 2R, 10S, 2R
R35: 3R, 3S, 1R, 3S, 1R, 1S, 3R, 2S, 1R, 3S, 1R, 3S, 3R
R36: 4R, 2S, 2R, 2S, 1R, 1S, 6R, 2S, 2R, 2S, 4R
R37: 5R, 1S, 3R, 1S, 6R, 1S, 1R, 1S, 3R, 1S, 5R
R38: 28R
R39: DecR, 24R, DecR
R40: DecR, 22R, DecR
R41: DecR, 20R, DecR
R42: DecR, 18R, DecR
Fasten off. I attached my eyes between rows 30-31, and about 9-10 stitches in, the graph I drew shows this better. I used Black and Pink to sew the mouth, eyebrows, and cheeks on his face.
Since I wasn't planning on hiding the loose strings, I tied a lot of them together in the back to secure them a little more. This will be the inside of the doll, and unseen. Also he looks pretty frightening on the inside, lol! Begin the backside :)
BACK:
Begin with G and ch 21, turn
R1: 20G
R2: IncG, 18G, IncG
R3: IncG, 20G, IncG
R4-10: 24G
R11: DecG, 20G, DecG
R12: DecG, 18G, DecG
R13: 20G
R14: DecG, 16G, DecG
R15: DecG, 14G, DecG
R16-19: 16G
R20: 5G, 1R, 10G
R21: IncR, 1G, 1R, 2G, 2R, 2G, 5R, 1G, IncR
R22: IncR, 16R, IncR
R23: IncR, 18R, IncR
R24: IncR, 20R, IncR
R25: IncR, 22R, IncR
R26: IncR, 24R, IncR
R27-38: 28R
R39: DecR, 24R, DecR
R40: DecR, 22R, DecR
R41: DecR, 20R, DecR
R42: DecR, 18R, DecR
Fasten off. Since I wasn't planning on hiding the loose strings, I tied a lot of them together in the back to secure them a little more. This will be the inside of the doll, and unseen.
HOOD (Optional):
Begin with G and ch 17, turn
R1-4:16SC
R5: DecG, 12G, DecG
R6: DecG, 10G, DecG
R7: DecG, 8G, DecG
R8: DecG, 6G, DecG
Fasten off, leave a long tail for sewing, sew onto his cloak near his hair, but allowing to see the ends of his hair.
HANDS: Make 4 pieces, sew together 2 pieces to make each hand. 2 hands total
Begin with T and ch 6, turn
R1-2: 5T
R3-4: 5S
R5: DecS, 1S, DecS
After making your pieces, take 2 pieces to make the first hand. Join both sides by SC around the edges evenly, with the same color as the edges. Switch colors as you move around the sides. Stuff with polyfil as you go. Hide tails inside your work. SC around the edges gives it ragdoll look!
FEET: Make 4 pieces, sew together 2 pieces to make each hand. 2 hands total
Begin with LB and ch 7, turn
R1-2: 6LB
R3-4: 6DB
R5: DecDB, 2S, DecDB
R6: 4DB
After making your pieces, take 2 pieces to make the first foot. Join both sides by SC around the edges evenly, with the same color as the edges. Switch colors as you move around the sides. Stuff with polyfil as you go. Hide tails inside your work. SC around the edges gives it ragdoll look!
Now it is time to put Kvothe together! I began at at one of the corners of his head. Attach both the front and the back (right sides facing out) by SC around their edges using the appropriate color. Switch colors as you make your way around his body to be the same color as the edges. When you reach the arms, begin first by dropping your SC row. With a separate bit of yarn, sew through the front piece, arm, and back piece to secure them together, then hide your end. Pick your SC back up and SC along only the Front piece.
Since this sounds pretty confusing to me while I type, here is a picture of the arm. The arm has been sewn together with the front and the back piece, however, the SC edging is only done to the front piece. Continue along your Kvothe doll until you reach the beginning SC, stuffing your doll with Polyfil along the way. Join and hide any tails showing!
LUTE (Also Optional, but cool):
Front:
In T ch 7, turn
R1: 6T
R2: IncT, 4T, IncT
R3: IncT, 6T, IncT
R4-8: 10T
R9: 4T, 2LB, 4T
R10-11: 3T, 4LB, 3T
R12: 4T, 2LB, 4T
R13: DecT, 6T, DecT
R14: DecT, 4T, DecT
R15: DecT, 2T, DecT
R16: 2DecT
R17-24: 2LB
R25: LB, IncLB
R26: 3LB
Fasten off. Sew a little Tie Block (Bridge) detail to the front of your Lute near the base. Continue to the back.
Back:
R1: 6T
R2: IncT, 4T, IncT
R3: IncT, 6T, IncT
R4-12: 10T
R13: DecT, 6T, DecT
R14: DecT, 4T, DecT
R15: DecT, 2T, DecT
R16: 2DecT
R17-24: 2LB
R25: IncLB, LB
R26: 3LB
Fasten off. Join the two sides of the Lute by SC around the edges (facing the RS) in the appropriate colors, stuff with Polyfil as work along. Join to the first SC, Fasten off, weave in tails.
Thank you so so so much for reading my pattern! Hope your project turns out wonderful! -Natasha (mnopxs2).


